Advice and Tips on Beekeeping
by Fronefield Crawford
It's not really advice yet. It is more just notes I am making.
I'll have advice once I know what works.
I am a member of the Chester
County Beekeepers Association (CCBA).
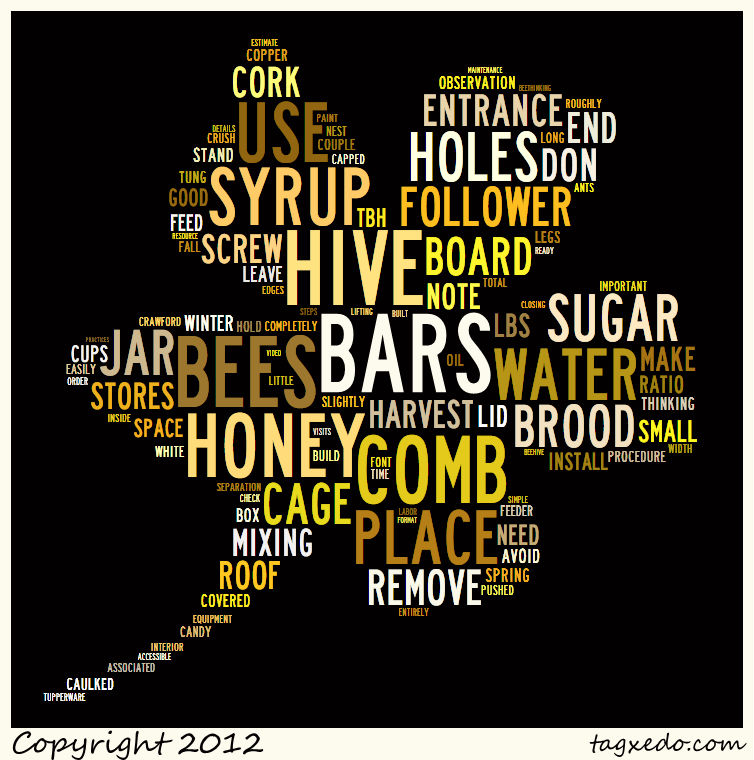
The Hive
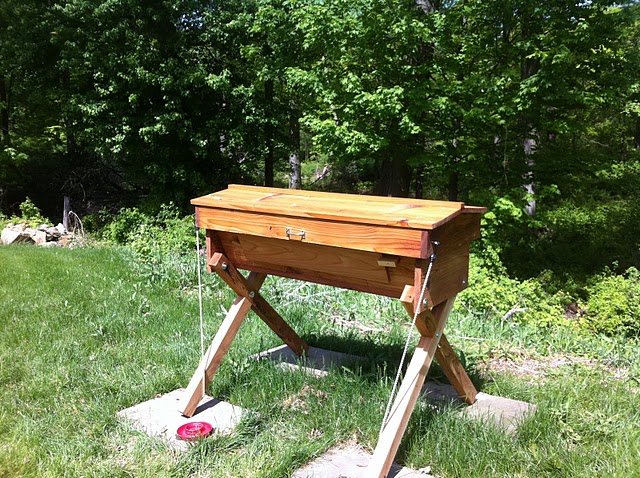
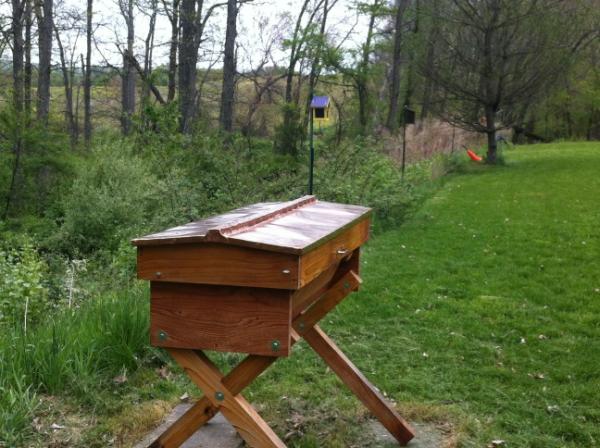
I am using a "Kenyan-style" (horizontal) top bar hive (from Bee
Thinking) rather than a traditional Langstroth hive.
The TBH is expected to produce roughly half the honey (30-45
lbs. per season -- but little in the first season!) of what the
Langstroth produces (60-90 lbs. per season). It produces much more
wax, though.
The TBH is made of cedar and has an observation window on one
side. There is a hinged liftable roof (essentially an outer cover).
There are 30 top bars total that span the hive (each has a width
to give the appropriate "bee spacing" inside the hive). This includes
two follower boards with the same width as the other bars.
The wooden roof was covered with 3 coats of pure tung oil for
protection from the elements. The other exposed surfaces are coated
with one coat of tung oil. The interior is untreated.
Note that after one season I was unhappy with the tung oil coat,
so I covered the wooden roof with copper sheet. I used 24 gauge = 22
mil = 16 oz. copper sheeting. See this thickness guide.
I caulked all the interior joints and the joints on the roof so
that water/rain doesn't get in. I caulked the edges of the
observation window so that bees don't squeeze through. The bees can
eat through the caulk at the window edge, and I found that bondo
filler works well when these holes develop (they can't eat through
that).
There are 6 side-entrance holes, but only 1-2 are open to start
(these are at one end of the hive). The other holes are stuffed with
wine corks.
You can lock the hive roof with a latch (bungee cords) so that
raccoons and skunks don't get in. With the copper roof, this is not
necessary since the roof is heavy enough.
The hive legs stand on flagstones to avoid having them sink into
the ground when it gets wet.
Auxiliary Equipment
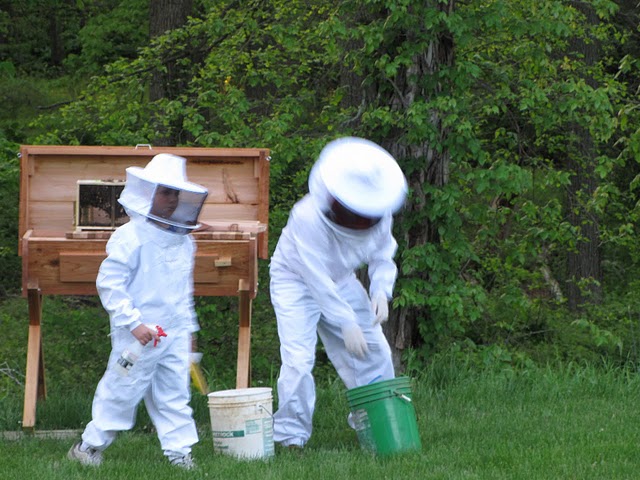
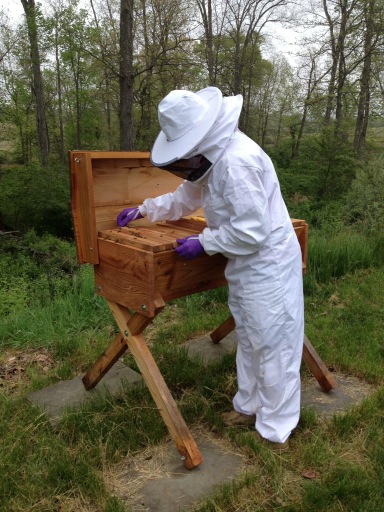
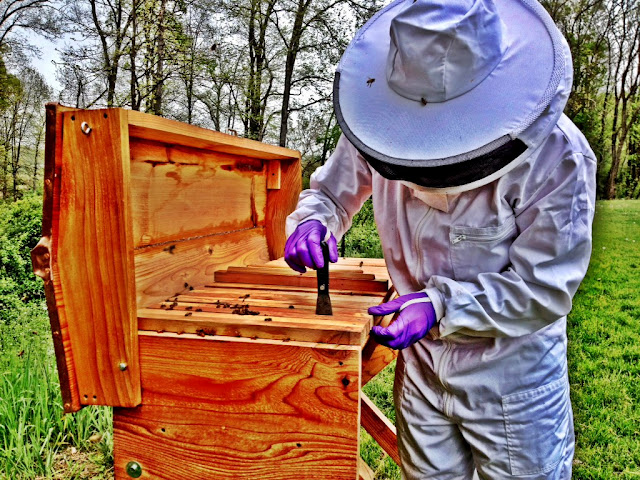
Veil with full suit
Leather gloves with gauntlet (for honey harvest late in season)
Purple nitrile exam gloves for other inspections.
Top bar hive tool (from BackYardHive),
good for cutting comb from sides and picking up bits of comb at the
bottom of the hive. Also be used to pry propolized bars.
Small paint scraper (for prying) and serrated knife (for cutting
and separating bars and comb).
Smoker, lighter, and fuel (dry pine needles from white pin tree works well)
Bee brush
Spray bottle with alcohol (for removing sticky honey or propolis
after inspection, NOT for bees)
Tupperware container with lid (for combs during extraction)
Paper towels
Bee Installation in the Top Bar Hive
Ordered 3 lbs. Italian bees with marked queen from Walter T. Kelley Bee
Company. Arrived at post office.
Note that I also ordered a Russian bee
package with marked queen for a second TBH I set up
in 2014.
Put all the top bars on the hive and place the follower board
back 10 bars from the entrance end of the hive.
Remove 5 or more bars between the entrance and follower (to
install the bees into hive).
Spray package bees liberally with sugar water (1:1 sugar to water
ratio, see below for mixing procedure).
Light the smoker.
Plywood off box. Tilt box sideways and place on hive.
Remove syrup can and hold queen cage strap. Place syrup can
aside.
Remove queen cage, brush off bees, place cage to one side.
Give the box with the bees in it a couple good stern shakes as
you empty the bees into the hive. Place box on ground next to
entrance. The stragglers will find their way in before too long.
Remove the cork on candy end of queen cage (twist small screw in,
then pull cork out).
Suspend the queen cage between the 3rd and 4th bars from the
entrance. Candy end down. Use a long screw partially screwed into the
top of the cage to suspend the entire cage low enough to be below the
bars and without much of any space between bars. You can use a fender
washer under the head of the screw to prevent the screw head from
falling through the bars (i.e., put the screw through the washer
before it enters the cage and keep the washer stationed above the
bars). Note that TBH keepers suggest not hanging the queen at all,
but rather place the cage on the bottom of the hive so they won't
build crooked comb from the start (but I have not had a problem yet
with any cross comb from building off the queen cage).
Put all but 1 bar back on the hive.
It can take about an hour or so for all the bees to find their
way into the hive, replace your last top bar.
Install a feeder after the bees have been installed (see
below).
In a couple of days, check on queen and make sure she is gone
from cage (if not, then release the queen slightly above the hive so
she goes into the top of the hive).
The Feeder and Feeding
- Use a one quart mason jar with small chicken waterer font screwed
onto the top. This gives the bees a 1 cm rim from which to drink the
syrup from the font.
- Another option is a one quart mason jar with a standard metal
screw lid with several small holes punched in the lid. Attach a few
small legs (nubs) with Krazy glue to the top of the lid so the jar can
stand upside down with the lid at the bottom standing slightly off the
ground to avoid crushing bees. The syrup will flow slowly through the
lid holes.
- To make spring syrup, use a 1:1 sugar to water ratio. 3
cups of sugar and 3 cups of water will produce just about 1 full quart
of syrup for the jar.
- To make fall syrup, use a 2:1 sugar to water ratio. 4 cups
of sugar and 2 cups of water will produce just about 1 full quart of
syrup for the jar.
- Use hot water (but not boiling) and mix in the sugar until it is
dissolved. Pour into jar and let cool.
- Place jar upside down on the hive bottom toward back near the
follower board, and syrup will fill the font. Try not to crush any
bees when placing jar in.
- This places the feeder entirely within the hive and the syrup
level is visible from the observation window so replacement can be
planned.
- The jar will need to be replenished every couple of days with
syrup until you are satisfied that they don't need to be fed.
Initial Setup and First Season Maintenance Instructions
Place follower boards so that about 10 bars are accessible to the
colony at first (this is important since it helps to establish the
brood nest in the front of the hive).
Open only 1-2 corks, leaving the rest closed up.
Install bees at one end of the hive (see above).
See above for feeding in spring (use 1:1 ratio sugar water for
spring, use 3 cups of each ingredient for one quart of product). See
above for mixing procedure.
More frequent visits are required than to a Langstroth hive to
ensure the colony always has ample space for honey storage.
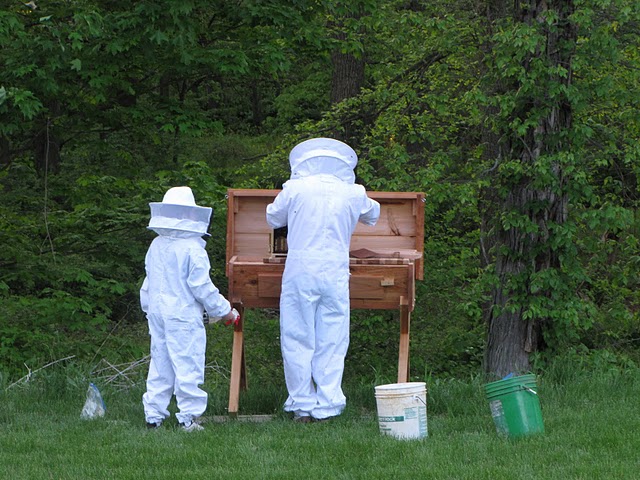
The hive visit:
- 2 or 3 of the top-bars are removed from one end of the hive
(these will generally have neither bees nor comb on them). This
opening need be only wide enough to permit lifting the combs for
inspection without bumping or scraping them.
- By successively moving each bar, you shift the inspection gap
gradually towards the brood nest (the heart of the colony).
- Puff a very little amount of smoke into the opening, and
the bees will be driven away from the gap into the undisturbed part of
the hive.
- Be very careful lifting the bars since the comb can break easily!
Hold bard vertically only.
- Place each bar carefully on a top bar stand to free your hands
for inspection.
- When pushing the bars back together when closing up, be careful
not to crush bees. One way to do this is to hold the bar so that it is
lined up with but slightly above the next bar. Slowly lower it down
flush with the next bar and the bees below will be pushed down.
Over the first few weeks the colony will rapidly build comb.
You must ensure that the comb is straight so you can easily
manipulate it later on! If it is crooked (cross-combed), you will
need to gently push it back into place on the bar. It is the last comb
in the sequence that will determine the next one, so make sure the
last one is straight.
Any broken comb (non-brood?) should be placed at the bottom rear
of the hive for about a day. By this time, the bees should have
cleaned up and removed any honey etc. from the comb, and you can
remove it from the bottom of the hive with the long hive tool without
dripping.
As the colony grows, move the center follower board toward the
other end, providing them with more space to store honey and brood.
Open more entrance holes and move follower board back as the
space gets filled with more comb.
Don't switch around bars with brood comb (i.e., don't reverse any
bars or re-order them in the hive), since mixing up broodnest can lead
to failure. Apparently, the broodnest structure is quite important.
If the brood bars are being completely used, it is important
to move honey stores back farther away from the entrance so that new
empty top-bars can be made available for new brood comb (i.e., place
some empty bars between the brood and honey combs). This is a
condition called being "honeybound" and must be avoided to prevent
swarming. But do not move brood bars around (see above)!
Honey Extraction
Usually you do not harvest from first year colonies. They need
the food and there is usually not enough extra honey. Many TBHs are
harvested in the spring (to maintain enough stores for winter).
Labor Day is a good reference date to keep in mind as around the
last time you would want to harvest honey. Note: Another
alternative is July extraction, with mite treatment after, giving them
enough time to store up reserves for the winter.
Take only capped honey. Uncapped honey (nectar in open cells) is
not ready for harvest. It still has too much moisture, will be too
runny, and might ferment. The bees will know when the honey is ready
and will cap it then.
Cut the comb from the top bar into a bowl, leaving behind an inch
or so of the wax comb on the top bar.
Don't leave combs out in the open after they are taken off. This
encourages robbing. Use a sealed tupperware bucket for storage at the
hive.
If there is any brood on the comb you cut, remove it prior to
mashing it up. You don't want it mixed in with your honey.
A 5 gallon paint strainer (mesh) is useful for straining the
honey from the wax in this process.
Avoid mixing any water in the honey extract. It will ferment.
See
"A
Simple Harvest" for steps for simple extraction and separation of
honey and wax.
I estimate that a full bar of capped honey comb should provide
roughly 32 oz. (a quart mason jar) of extracted honey (no wax
included). Note that this may be an underestimate if the bars I
extract are small.
Overwintering and Honey Stores
Reduce the entrances to 1 open cork hole at one end (maybe even
reduce this further using a cork with a smaller hole drilled through
it to allow one bee to pass through at a time). Keep the 3 top
ventilation holes open.
For the one open hole, I screw a small piece of quarter-inch
hardware cloth flat onto the hive so that is covers the hole. This
allows bees to come and go through the mesh but no mice can get in. I
generally leave this in place all the time (not just winter).
Move follower board up snug against last honeycomb (to reduce
volume).
Don't rearrange or remove any combs after about September since the
bees have organized things the way they want for the winter.
Labor Day is good for a final inspection to make sure they have
enough stores for winter.
Check hive for stores of honey. Go through every single comb in
the hive and heft them. A completely built out comb full of honey
weighs somewhere between 5-7 lbs. Just estimate the weight by adding
up each comb (including the brood combs with a band of honey at the
top). If they've got over 40 lbs. or so leave them. If less then feed
them. Les Crowder indicates that 12 combs are sufficient for winter
(corresponding to 60-80 lbs. total if these are completely built out).
If not enough stores, then in the fall (highs in the 50's or
above), feed syrup (use 2:1 sugar to water ratio for winter, see above
for mixing procedure).
Since there may not be enough room in the hive for the syrup jar
after you have moved the follower board up against the comb, one
option is to drill a hole in the follower board and leave the syrup
jar on the non-bee side. Bees will be able to access the syrup through
the hole. You can easily plug the hole with a cork if you ever need to
block it up.
When colder weather comes, feed drivert baking sugar OR fondant
(a solid candy which will not freeze).
Note: I think dry granulated refined sugar might also be
OK. Perhaps sugar cubes inserted into the hive via the corked hole?
See more winterizing details here.
Mead
See my updated mead recipes at this link.
This is to make mead out of raw honey from the hive.
Put water in with raw honey in a clean container at a 3:1 ratio
(3 parts water to one part honey). For one gallon total, try 12 cups
water to 4 cups honey.
Add white wine yeast (Lalvin 71B-1122) and stir.
Put mixture into glass jugs with airlocks on top (airlocks with
rubber stoppers are cheap at the homebrew store).
Let sit for a month, occasionally stirring.
When bubbling stops, bottle it up in small bottles (or keep in
sealed jug) and let it age if you want.
Drink it! Note that you will have all sorts of strange
hive-smelling flavors in there from the hive products present in the
raw honey.
Some Notes
No medication is used. Note: I may try mite treatment in late
summer.
The brood comb is dark, and has lots of white eggs and pupae. The
pollen comb is colorful. The honey comb is mostly white.
Ants a problem? (1) Rub vaseline around the legs to create a
barrier through which the ants cannot climb. (2) Sprinkle cinnamon
along the top bars (but not inside the hive) and along the ground
under the hive. The ants hate cinnamon but the bees don't mind it.
Good Top Bar Hive Resources
Bee Thinking Hives (top
bar hives and associated equipment, plus advice and information)
Top-Bar
Beekeeping: Organic Practices for Honeybee Health (a book by
by Les Crowder)
Michael Bush
top bar hive Q&A page
TBH
FAQ: Overview, Construction, Harvest, Miscellaneous
Langstroth's
axioms
Why bees are important
Videos
Beehive video #1 (.mov format)
Beehive video #2 (.mov format)
Pictures


Return to Froney Crawford's Homepage